Dolly Eyland, by Alexander Keith, 1808. (c) The New Art Gallery Walsall; Supplied by The Public Catalogue Foundation
I like Dolly. The colors, the textures, the style of her gown, shawl and cap all please me. She’s rocking some serious class for a woman headed towards a certain age. And she’s wearing a cross-front gown, which is what I settled on for my Quaker costume.
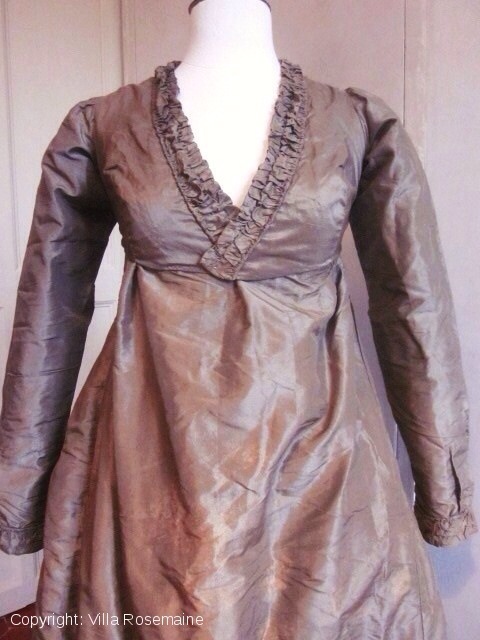
Taffeta dress, ca.1800-1810, Originally found on Villa Rosemaine site, where it does not appear now.
The trouble with making a gown based on an artistic sketch in a book is that you don’t have the most complete sense of what that garment looks like, or how it goes together.
Not to worry, I went ahead anyway, because this is as close to Everest as I will ever get.
But I wanted comparable garments to help guide me. Ages ago I found the gown at left on a French costume site. That’s helpful, in that it explains the trickiness of assembling and wearing this style of garment. Three pieces coming together in the front may be one piece too many.
In making up my pattern, I used the pattern for the Spencer as a starting place because I knew that the set of the sleeves and arm scye were what I wanted. No reason to re-invent that process!
That left me with the luxury of concentrating on the neckline.
That took a few goes with the tracing paper and muslin: I did lose count after a while. There may have been tears, there definitely was swearing. Mr S at one point made jokes about this process appearing on the Discovery Channel’s “How it’s Made” as “the Quaker dress.” He’s really very patient, and I do understand the selective deafness he’s had to develop as a defense against the dark arts of sewing historic clothing.
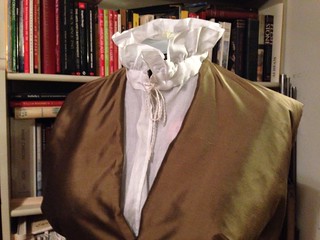
Thank you, Cassidy, for the chemisette!
Eventually, I had a decent lining and even some silk bodice fronts. I fiddled with the fronts, and settled on gathers instead of pleats, but couldn’t quite figure out where the casing went. Some days I can process drawings into objects, some days I can’t. I’d just about reached the point of cutting it all up into the gown I always make when I discovered that the excellent women of the 19th US had patterned the gown from the drawing, too. (If you don’t already use this site, I highly recommend it. Excellent work.) Those pattern pieces look like my pattern pieces, so I decided it was worth carrying on with what I have.
Robe à la Polonaise ca. 1775 British silk Length at CB: 56 in. (142.2 cm) Purchase, Judith and Gerson Leiber Fund, 1981 MMA 1981.314.1
Scrolling through Pinterest lately, I was struck by how different two presentations can make one gown look.
Above, a lovely Ikat-type silk gown with en fourreau back and trim, center front closing and probably a little closer to 1778 or 1780 than 1775.
It’s presented on a mannequin that supports the gown for photography and allows us to see it clearly, from the trim at the neck to the pleats down the back and the pleasant fullness of the skirt.
The gown is shown, we get the details.
And then, in another image, another view.
Robe à la Polonaise ca. 1775 British silk Length at CB: 56 in. Purchase, Judith and Gerson Leiber Fund, 1981 MMA 1981.314.1
In this image, the gown (and its companion) have been styled and accessorized, fichus, hats, ribbons, sashes. The skirt is more fully and completely supported, showing off the silk to even better effect. We lose the trim and pleating details, but the gown is much more attractive in this view.
This is not meant to criticize the images or the handling of the costumes, but to point out that you have to look past the plain record shots in museum databases, and see the gown as it would have been worn. Working with database images, and re-creating garments from those images, requires a leap of imagination.
The more you look (at database photos, exhibition photos, extant garments, fashion plates, other re-creations) the better you will be able to imagine the garment as it might have been, and to make it yourself.
To be fair, original garments cannot always be mounted in stylish and appropriate fashion, but they can still tell us something. The more you look, the more you’ll see.
For this challenge, I initially thought I’d be working on the compere fronts for a silk sacque, but then I took another look at the calendar and realized March was awfully close! Instead, I opted to spend the past week working to better understand the Quakers, especially Quakers in Rhode Island, in advance of a program in early March. (I did do #1, Make Do and Mend, but do you need to know about re-stitching a petticoat binding?)
‘Quaker’ bonnet
To help get myself out of a sewing rut and panic, and a general malaise, I made a bonnet. A ‘Quaker’ bonnet. Bonnets are like cupcakes: delicious, sugary, but lower in calories and committment than a full garment.
Quaker bonnet ca. 1800, Nantucket Historical Association, 1928.54.7
Quaker women in the late 18th and early 19th century did not, as far as I can tell, wear the black ‘sugar scoop’ bonnet we now associate with Quakers.
There are numerous entries in Amelia Gummere about bonnets, and types of bonnets, and the reflection of particular sects of Quakers in the pleating of the bonnet caul. But early in the 19th century, at the dawn of the Age of Bonnets, Quaker and non-Quaker styles seem to have been closer.
Fashion Plate: Promenade Dresses, 1801. Museum of London. 2002.139/1397#sthash.YsOpwKG2.dpuf
The fashion plate from the Museum of London presented a style that I thought I could approximate, and that made sense to me for 1800-1810ish, but I chose an olive green silk (actually yellow and black sort-of-changeable taffeta) because I have seen Quaker bonnets in olives and tans, especially earlier bonnets. Going with a color that was less distinctive, and a form that was undecorated, seemed to me to strike the best balance between plainness and style in this time period.
I chose this for innovation because the new bonnet forms of the early 19th century are departures from the full, round, pudding-on-the-head styles of the late 18th century, and the Quakers took it a bit further. In standardizing the appearance of their bonnets (simple, unadorned, eventually ossified in form and signaling sect in pleat patterns), the Quakers were innovators in clothing as outward symbol and sign of inner faith and affiliation.
There’s your rationalization, how about some facts?
The Challenge: HSF # 2,Innovation
Fabric: Sort-of-changeable black and yellow silk taffeta in olive green for the body and ribbons, white linen for the caul lining and brim interlining, white poly taffeta for the brim lining, and pasteboard for the brim.
Notions: Thread, PVA (acid-free white glue for book binding)
How historically accurate is it? Well, white poly taffeta aside, pretty accurate. All hand-stitched and assembled in a period method. Gentlewomen can disagree about accuracy of style, but we could call this a plain bonnet ca. 1803 and be safe. After March, I can decorate the bonnet. The poly will remain, so, well, 60%? (How many points from Gryffindor for using the right weave in the wrong fiber?)
Hours to complete: Five, perhaps? These are quick, so five would be from start to finish, not including agonizing in advance.
Mr S’s day took a bit of turn.
First worn: First by Mr S, who wasn’t feeling well, but to be carried along by me on March 7.
Total cost: All supplies came from the Strategic Fabric Reserve and chip board depot. It takes so little of anything to make a bonnet…maybe $2.50 in silk, $3.00 in linen, .50 in chipboard, so $6.00? (The silk came from the remnant table at $10/yard, chipboard is $2.00 a sheet, and linen about $12/yard.)


You must be logged in to post a comment.