Six Toiles, a Coat and a Bonnet

14557116394_73c2d5ea9f_zYes, six toiles.
That’s how many it took to get a coat pattern to fit Mr S the way I thought it should. I finally built the pattern around a sleeve and arm scye that I knew worked and suited the period. From there, I built out the back, altering the center back seam curve to suit Mr S’s figure. Arm scyes are still hard for me to figure out, although sleeves are often my favorite part of a garment. I like how flat pieces become three dimensional in a sleeve, and I enjoy setting sleeves– go figure.

Thanks to the three-day holiday weekend and sitting out a parade to pad stitch, I have a coat body.

I’m not thrilled about the size of the lapels, though I have found extant examples and fashion plates showing lapels this size, and sleeves, too. While I’ve pinned up the sleeves in the back, thinking there’s too much fabric there, I can also see from the images that the subject’s posture was not the best– and that was the moment when I realized that I really did want a mannequin for menswear as the subjects are hard to catch at any age, and variable in posture and wiggliness. They also object to being pinned accidentally.

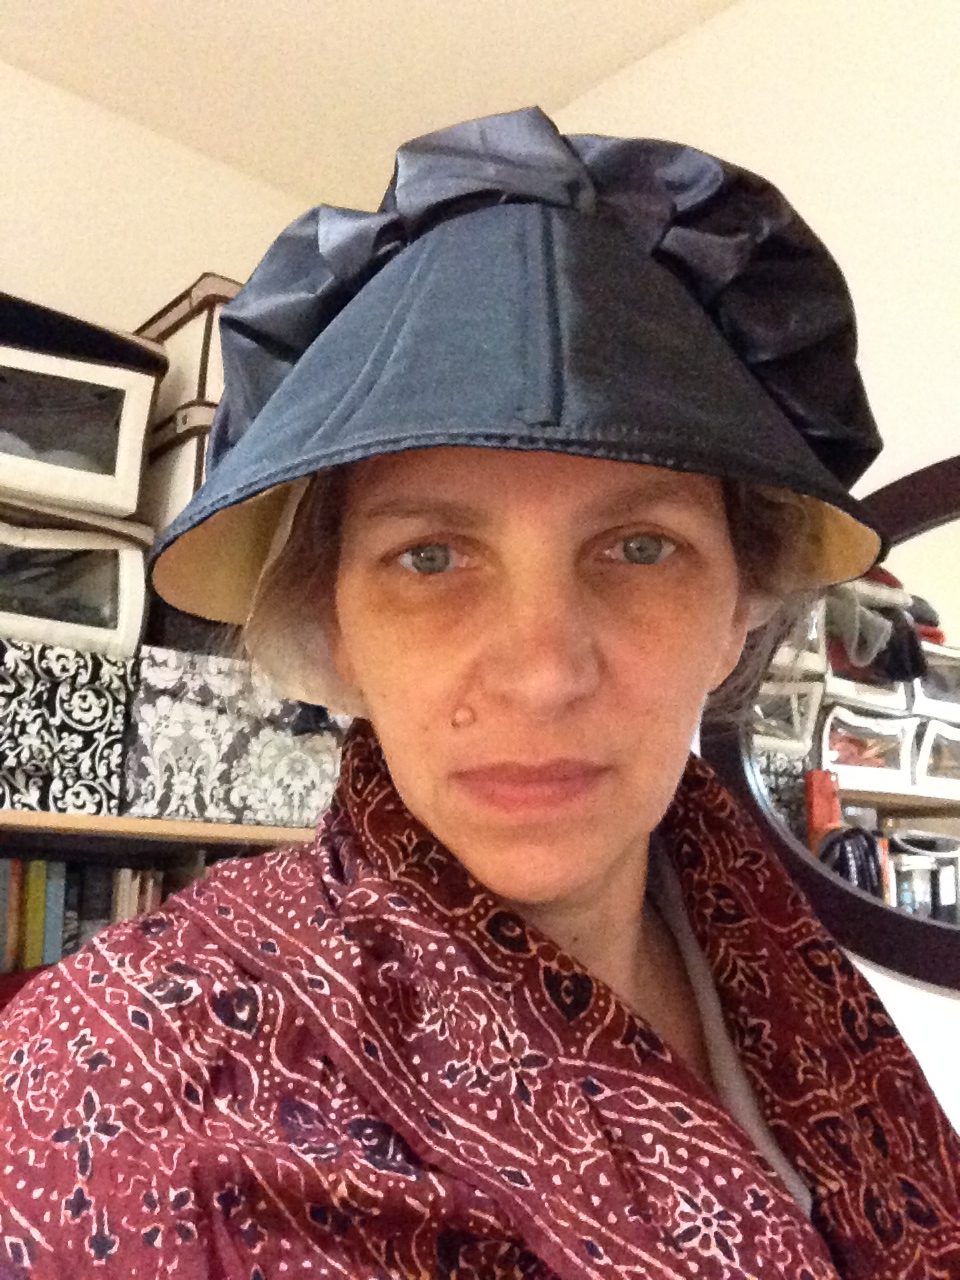
But there is at least a coat body on the way to being done, so I took a break and made a bonnet, which is really the point here <ahem> milliner’s, not tailor’s, shop, after all.

IMG_1738

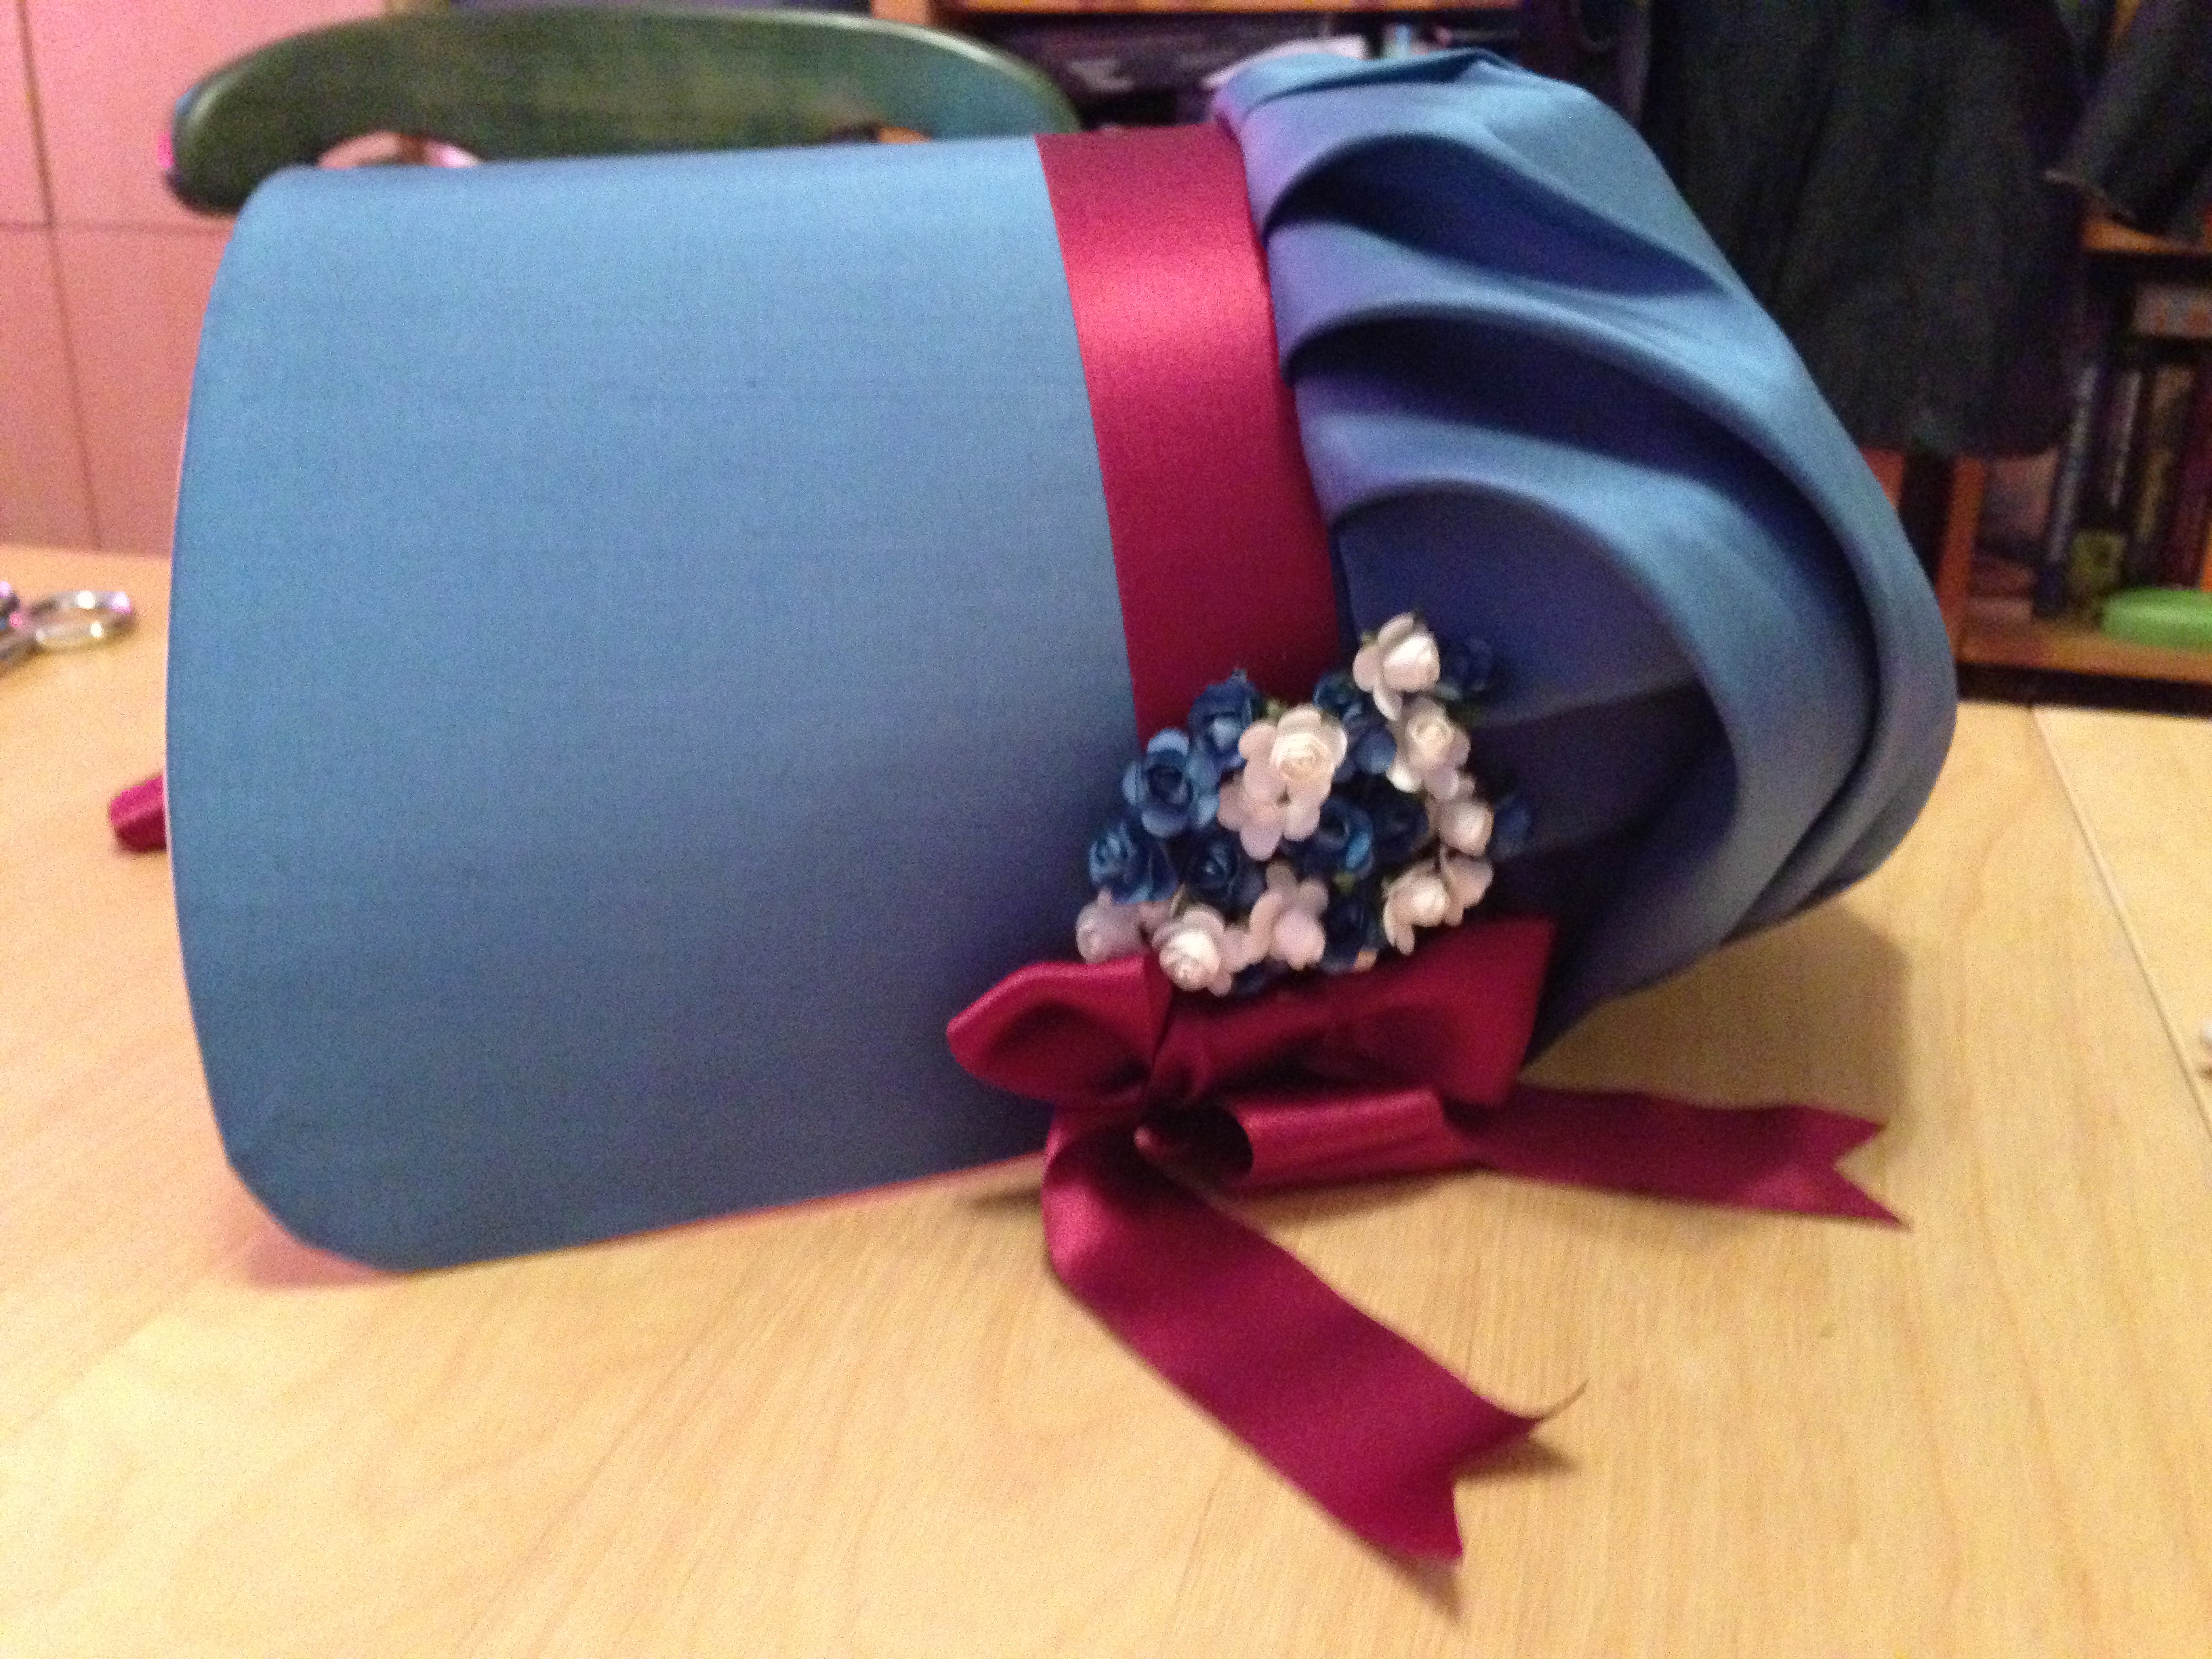
Pasteboard brim, blue silk taffeta lined with white silk taffeta (they had new things at the fabric store, very exciting!), trimmed with silk ribbon from Wm Booth and paper flowers from the V&A.

Now, more bonnets, two waistcoats, a gown, an exhibition, a lecture, and Stony Point are all that stand between me and the milliners’ shop in Salem…

Back Bump: The Regency Silhouette

Ah! Quelle antiquité!!! Oh! Quelle folie que la nouveauté ... Engraving, 1797. 1892,0714.755 British Museuem
Ah! Quelle antiquité!!! Oh! Quelle folie que la nouveauté … Engraving, 1797. 1892,0714.755 British Museum

Regency, Federal, Early Republic:  we use these terms to cover (roughly) the period from 1790-1820, though technically the Regency period would mean only 1811-1820, when George IV served as Prince Regent, ruling for his incapacitated father, George III. In the United States, “Regency Costuming” is a bit of misnomer if you’re copying early American gowns, but it does serve as a handy short-hand we all tend to understand.

Grossly, the principles of dress are rooted in neo-classicism and republicanism rising from the American and French Revolutions. Specifically, we see a turning away from the heavily-boned, panniered, and formal gown styles to the looser, short-stayed, flowing, simpler gowns.  The transition is summed up for me in this satirical print.

So, you’re no longer side-to-side wide, baby: you gotta have back.

How do you get back? There are a couple of perfectly authentic tricks that do not require you to stuff a cat into the back of your dress, though you can do that if you want. The combination I have found to work is two-part: a small, crescent-shaped pad, and the method of pleating. How you deploy the pad and the pleats will give you the silhouette you desire.

First, though: which silhouette? In really the 1790s, the silhouette is rounder than you might think. It really is a round gown.

To get that look, I use a small rump pad, bustle pad, or bum roll (call it what you like), which is stitched to the inside of my petticoat.

That’s the white IKEA curtain petticoat I made during the extended snow days of last year, and which I have worn with the red curtain-along open robe and under the petticoat and open robe for What Cheer Day. The pad is the same natural light-weight linen I use for a many gown linings, filled with bamboo stuffing. If I’d had wool on hand in the small hours of the morning I made this pad, I would have used it, but all I had was bamboo in the rush to finish up and have something to wear for a photo shoot.

The other key factors are pleating styles and fabric weight. Pleats can add lift, but in general, the lighter the fabric, the more lift a small pad will give you.

1780_1790
I’m particularly fond of the pleats used for the gown shown on page 75 of Nancy Bradfield’s Costume in Detail. I’ve used this as a guide several times, and I am very pleased with the results. They do vary, of course, depending on fabric weight, fibre, and length. Stiffer cottons, like the Waverly Felicity of the curtain-along gown, will make a round shape; tropical weight wool does fairly well, also, but the most amazing 1790s rendition I have achieved to date is the light-weight India print cotton short gown.

Now that’s 1790s back. The bustle-like shape surprised (OK, shocked) me, but on the whole, I think I’m pleased. So there you are: pad, petticoat and pleats: that’s how you get back.

A Whale-Safe Bonnet

Complete with my interpretation of "Hat Face"
Complete with my interpretation of “Hat Face”

As promised, my interpretation of the ribbed bonnet in the 1789 engraving. There are a few problems with this beyond the model. (Which is not to say that I don’t like this bonnet– I do!)

I used the Kannik’s Korner bonnet pattern (view F, I think) as the basis for this because I already had a brim, lining, and caul cut and in a drawer. Given my current medicated state, using something pre-cut seemed advisable. That means I didn’t play with the brim to create the line of the Williamsburg bonnet, or the curve of the brim in the “Fortune Teller” engraving.

Detail, The Marquis of Grandby

Is this style acceptable for the period I typically interpret (1775-1783)? Well… there are other examples of the lampshade-style bonnet, as in the Edward Penny painting of the Marquis of Granby. This painting is dated “after 1765” so there’s some room for interpretation there…too much room. But if that’s 1765-1770, and the “Fortune Teller” is 1789, I think we have comfortably covered the 1775-1783 time frame, even if it is a bit like a queen-sized blanket on a twin bed.

Front view: more lamp-shade like.

As you can see, the bonnet does have some lamp-shade-like tendencies on my head, which I consider a benefit. I like the way the ribs are visible, even if I remain unconvinced by the caning. I think it’s a little too wide, and lacks resiliency, though to be honest, I have only felt baleen at the New Bedford Whaling Museum, where there is a large sample on the second floor.

To compensate for the disappointing cane in the brim, I slipped a piece of millinery wire into the pocket underneath the cane. The layers in the brim are:

  • black taffeta
  • horsehair canvas
  • linen buckram
  • yellow taffeta

The channels are all hand-sewn, and then the cane was slipped in. I stitched the black taffeta caul to the first three layers, and then lapped the yellow taffeta over the raw edges and stitched it down to finish the brim/caul seam.

No, I didn’t take any in-process pictures…probably because this took considerable snake-eyed concentration last weekend. IMG_1477 IMG_1476

Usually, I line the cauls of my bonnets, but through shear laziness or distraction, I opted not to this time, and I think I’ll leave it this way for a while. You will also note that I have not trimmed this: I have some black silk ribbon coming, and I may try that. I don’t have enough black taffeta left to cut self-fabric ties, and there do seem to be some plain examples. A plainer, lamp-shade-like bonnet may be just the ticket for Bridget.

What would I do differently? Next time I would definitely play with the brim shape using a paper template. I’d like a lower, curvier, brim. Once I had the shape worked out in paper, I would use that as a template to cut the taffeta and horsehair or light buckram layers.

The Edenton Tea Party

I’d also try zip ties. I know: not period correct! But short of risking federal prosecution resulting from a trip to New Bedford with some shears, I’m not sure that anything other than plastic will have the resiliency and spring that baleen has, and that made these bonnets so special. I thought of them while making this bonnet, but I think Mr S used them all at work in the past two months. A Facebook friend has been thinking of zip ties, though, and has a hankering for one of these bonnets. I can’t say that I blame her– and honestly, I think I might join her.

Pockets 2.0

Pockets the First
Pockets the First

At left, Pockets 1.0 or perhaps beta. The far left pocket, when worn alone, was definitely beta. Then came the striped pocket, and then sewing them both to the tape. That helped– and I use the small pocket for things like wallet, phone, car keys and Band-aids, and the larger pocket for interpretive things. I try to follow the Under the Redcoat kind of model: one pocket is modern, one is historical; that way I don’t pull the car keys out along with the knitting, or am at least less likely to.

Too much stuff.
Too much stuff.

Here’s the stuff I carry in my purse today, actually a backpack-purse, downsized from a messenger bag. That’s a lot of stuff. But if you compare the list to the list of what might have been in an 18th century pocket, you’ll find a lot of similarities.

There’s a pen and a pencil, wallet and checkbook, granola bar, chewing gum, change purse, keys, more keys, and phone. All of those are just modern analogues for paper money, coins, orange or apple, candy, book and notebook, since the phone can fill in for so many things– notebook, money, keys, pen, book…

DSC_0174

The historical assortment is much more attractive, in part because I don’t use these things every day, and they don’t get tangled up and worn in a bag. Mitts, kerchief, hankie, my husband’s pay, knife, thimble, spoon, and knitting (I may never get a pair of stockings knit): these are all accurate to carry, though the knitting needles will have to change before that’s taken out in public.

DSC_0173

All that, or some combination of like things, will go into one pocket, and the modern mess into the other. I fear these new pockets are, for now, too nice for Bridget. I may just stick with my old, mis-matched ones for now.