This is an IKEA bed for children or cats, so it’s an affordable, durable option for hands-on demos. It’s reasonably easy to adapt, with a chisel and a drill (Mr. K has a little drill press which made the rope-bed conversion much easier).
I outfitted the bed with woven ropes and a sack bottom, designed to make the bed more comfortable (the mattress can’t sink through the sacking). That’s topped with a a bed (mattress) of ticking stuffed with wool.
Bed with sacking bottom laced to ropes
Beds were stuffed with a range of materials, including straw, cattails, cornhusks, hair, and wool. Hair is pretty itchy and I had wool on hand; in graduate school round one I slept on a wool futon so I can attest to its loft and comfort.
A feather bed tops the wool bed, feathers stuffed into a linen bag stitched shut. The linen is pretty tightly woven vintage material, and still the feathers escape! The case of checked linen ties shut. A ticking bolster, also stuffed with wool, supports the feather pillow in its linen case. The top sheet is, again, linen, with a center seam to mimic historical sheets.
This week, I started making the blanket. Modeled on an original rose blanket in the Colonial Williamsburg collection, I used wool broadcloth cut from a remnant. This, too, has a center seam like most originals. I have a stash of wool thread for embroidery, and matched the colors as best I could. It’s satisfying work, though I discovered that I’ve been stitching the wedges incorrectly (this is the result of having a laptop, rather than a large monitor). Oh well. I’ll stitch the last rose correctly.
Left, Colonial Williamsburg original; Right, my first attempt
The Workwoman’s Guide lays out how a bed should be made up, with layers of mattresses (beds), a feather bed, sheets, counterpane, and blankets. It’s a lot of layers. The Workwoman’s Guide was published in 1838, and although it is always dangerous to engage in backward interpretation (i.e. to apply the logic of 1838 to 1778), it is not unreasonable to think that an eighteenth-century bed would be similarly furnished. In houses without central heating, layers would be necessary.
While sheets and blankets could be made at home (butt-seaming linen or wool is easy), wealthy folks without enslaved laborers could order sheets and blankets from seamstresses or upholsterers. Betsy Cadwalader did not make her sheets, and while Martha Washington stitched cushion covers, the labor for the slipcovers or case covers was likely accomplished by enslaved seamstresses. The Cadwaladers ordered their case covers from Plunkett Fleeson, who probably had the work done by women rather than by more expensive male workers.
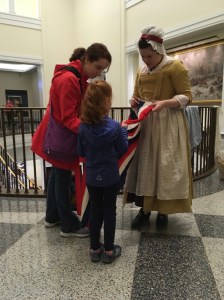
The new blanket will debut at the Museum of the American Revolution on Flag Day weekend, and I will once again talk about women’s work in eighteenth-century Philadelphia as they pivoted from domestic to military work during the Revolution.
One must keep up with the news (and the competition)
I’d call it “three times a lady,” but truly, I’ve only been a lady in Occupied Philadelphia twice. Last year and this year, I portrayed Elizabeth Weed, a widowed pharmacist living on Front Street in 1777 with her son, George. We don’t know why Elizabeth Weed didn’t leave the city along with nearly half the population. Was she a loyalist? Was her son too ill to travel? Or did she choose to stay to protect her property from the British– or the son of her late husband’s first marriage, who withheld a portion of the estate? Whatever the reason, remain she did, advertising her wares in the October 23 edition of the Pennsylvania Evening Post.
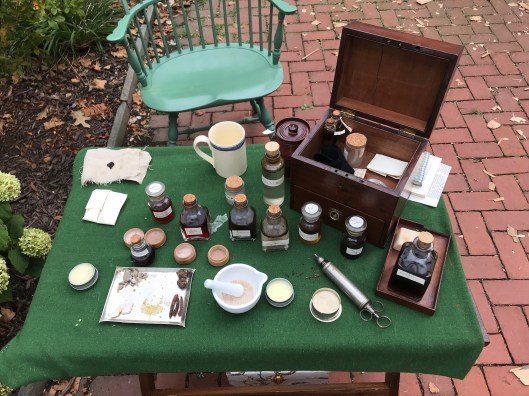
New remedies, new box, new ingredients: refining an idea
Last year, with Drunk Tailor’s assistance, I made a number of remedies using 18th century receipts, with some interesting and sometimes successful results. This year, we improved one– the yellow basilicum ointment– and added some new concoctions. The sulphur ointment for the itch (possibly scabies) worked well on the insect bites I got in the Carpenters Hall forecourt. A charcoal-oyster shell-cinchona bark-benzoin tooth powder was a new addition. I used the clove oil-scented pomatum to achieve the highest hair I’ve managed yet, but the truly satisfying work was recreating multiple recipes actually used by Elizabeth Weed.
As Drunk Tailor notes in his entry on this year’s event, we can never truly enter the 18th century mindset. Recreating the clothes, food, daily rhythms, and medicines help us experience the feel of the past, but we can never truly be those people. If you regularly cook 18th century meals, you’ll experience the palate of the past: aromatic, relying heavily on cloves, nutmeg, cinnamon, and allspice. This same range informs the aroma and flavor of the remedies from cough syrup to tooth powder.
Almost undoubtedly one of the ‘smells like Christmas, tastes like death’ tooth powders. Courtesy Jason R. Wickersty/Museum of the American Revolution
It’s a toss up which is less pleasant to the modern tongue, the Syrup of Balsam or the Syrup for the Flux. Both use the “paregoric elixir,” which some of you may recall from the medicine cabinets of old. Camphorated tincture of opium or anhydrous morphine has been used to treat diarrhea for centuries, and the ingredients for the modern version (anhydrous morphine) is remarkably similar to that for Weed’s paregoric elixir:
Weed’s Paregoric Elixir
Anhydrous Morphine (Paregoric)
8 ounces opium
Anhydrous Morphine, 2 mg
4 gallons spirits of wine, rectified
Alcohol, 45%
1 ounce oil of anise seeds
Anise oil
2 ounces Flor. Benzoin
Benzoic acid
8 ounces camphor
Glycerin
Purified water
There are some differences– most of us don’t want to ingest camphor, and “purified water” isn’t quite a thing in 1777– but the active ingredient makes these essentially the same compound. It’s an essential component of both Syrup of Balsam and Syrup for the Flux, so it had to be made first. Over the course of ten days, the elixir cleared from a yellow-orange slightly opaque liquid to a clear yellow liquid, with white sediment at the bottom of the jar (probably the benzoin).
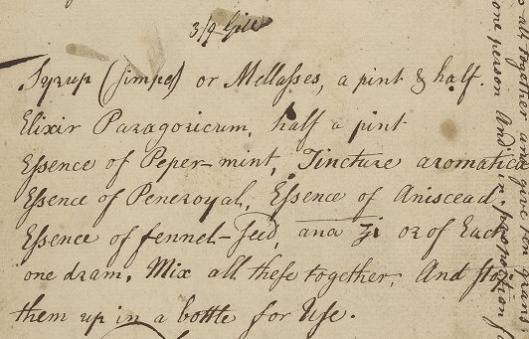
With that in hand, I was ready to tackle Weed’s most famous (and well-protected) remedy. It appears more than once in the daybook, but both listings use the same ingredients and proportions.
One of the original receipts for the syrup for the (Bloody) Flux. UPenn Ms. Codex 1049
Syrup for the Bloody Flux
1.5 pints, simple syrup or molasses
.5 pint, elixir paregoricum
1 drachm each:
Essence of peppermint
Essence of pennyroyal
Essence of anise seed
Essence of fennel seed
tincture aromatic
“Mix them all together, and stop them up in a bottle for life.” (Or, as the other receipt says, “Mix and Digest.”
The resulting mixture is probably meant to soothe the intestinal cramps (with anise, fennel, and peppermint) while the paregoric relieves the endless diarrhea. Licorice-flavored molasses with a peppermint tingle isn’t unpleasant so much as odd to the modern palate.
Syrup of Balsam defied expectations.
On the right: Syrup of Balsam: -10/10 would not taste again.
Syrup of Balsam
1 pint, simple syrup or molasses
.5 print, elixir parigoric
1 ounce each:
Essence of fennel
Essence of anise seed
Royal Balsam
Tincture of Balsam of Tolu
“These must be mixed together, and then put up for use.”
If I attempt this again– to be fair, I have enough ingredients and more knowledge– I’ll try to get the Balsam of Tolu to dissolve more fully into the main mixture, though I doubt the separation is why the taste is so unforgettable. While it did mellow after several days, the basic flavor remained licorice cough drops dissolved in corn liquor with an afterburn of turpentine. Fortunately, the dosage is not by the spoonful, but rather ten or more drops in a wine glass of water, depending on the constitution of the patient. As a “cure for the whooping cough,” the syrup with fennel and anise was probably intended to soothe the throat, and paregoric might have helped the pain of damaged lungs. Living in the post-DTaP era, I’ve never had whooping cough, or been around anyone who did, so it’s much harder for me to imagine treating it without antibiotics (or simply not getting it).
“No, really, no antibiotics!” Photo by Jason R. Wickersty/Museum of the American Revolution
That was really illuminating to some people: antibiotics weren’t invented until 1928 (in the case of penicillin) and were not available for civilian use until March, 1945. Until then, diseases like strep throat could be fatal. Often, the best medicine in the 18th century was to help a patient be comfortable, and ease their symptoms.
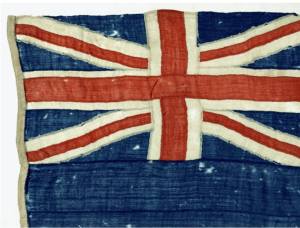
British wool bunting flag said to have been given to Tecumseh. NMAI Catalog number 23/730.
When I set out to “be” Rebecca Young, I thought I knew how flags were made in the 18th century– after all, I’ve made and seen a wide range of 18th and early 19th century items. But I was surprised when I got a look at a War of 1812 flag in the collection of the National Museum of the American Indian. (This was the closest, fastest option for getting a close-up look at an original, near-period flag in wool bunting, thanks to an inside connection.)
The questions I had were:
What materials were used? (My guesses were correct: wool bunting and unbleached linen thread) What seam techniques were used? (See below) How was a flag assembled? (Sequence of parts; see below)
The conservator shared the flag’s condition and treatment report with me in advance, and it was helpful:
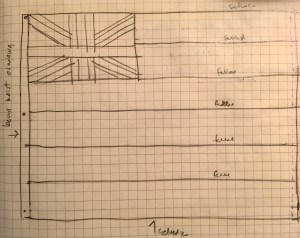
My sketch of the Tecumseh flag
“Based on notes written by Phyllis Dillon, 1977(?): The flag is constructed of 9″ wide panels of plain weave wool bunting (24 threads/inch) sewn together with french seams (approx. 1/4″ wide) using beige (white/red) and brown (blue/white; blue/blue) 2-ply S linen threads in a running stitch. The canton is constructed similarly using strips of white and red bunting with similar thread count. The hoist (approximately 1 1/4″ wide) is made from a plain weave, coarse, undyed linen folded over the raw edges of the seamed rows of bunting and stitched with a beige (undyed) linen thread; there are three hand-stitched grommets/eyelets at the corners and the center of the hoist which appear to use the same type of linen thread as the hoist stitching. (See analysis section for fiber ID). The blue bunting at the lower and upper edges of the flag are selvage edges, the fly edge is folded over and stitched with a 1/2″ wide hem.”
The date of the notes (42 years ago?) concerned me, and I wondered about the french seams. Most of what we see in the period are felled seams, so it seemed possible there was some confusion about the terminology. I’m confused about it after looking at tutorials and descriptions online, but perhaps that’s just me– in any case, the only way to answer this was to go and look.
What did I find?
Mistress V shows visitors our modern wool bunting flag
Materials
Wool bunting and silk were the most common materials used to make flags, colo(u)rs, and standards in the 18th and early 19th centuries. Colours, as advertised by Rebecca Young, likely referred to regimental colours, though a naval “colour” could mean a national flag flown by the ship. During the Revolutionary War, there were state navies in addition to a Continental Navy, further complicating the issue. (This complication also existed in the army. There are parallels today in the state National Guard units, which operate under a state or commonwealth governor, unless called into federal service. It’s your state national guard that comes to dig you out of your car in a major blizzard, but they can also be called to serve in wars, as you may recall from such debacles as Abu Ghraib.) Bunting came from Sudbury, England, and was woven in narrow strips. The strips on the Tecumseh flag are about 9 ½” seamed, suggesting that the width was about 10” including selvedges. Narrow strips are more flexible for assembly, and allow extensive use of selvedges to make seams narrower and stronger, because they’re less likely to fray.
Techniques
The running stitches in the Tecumseh flag threw me, because I’d expected back stitches, or combination stitch at least, but when I started working with the bunting, I understood. The loose weave of the bunting will pull and distort if you apply too much tension, so a backstitch would, in the end, be less useful than a running stitch. I doubt this is true of silk flags, though; silk, being more tightly woven, would better withstand a backstitch.
Wrong Side
Right Side
Because the Tecumseh flag is mounted and framed in a plexiglas case, I couldn’t touch the seams, or see the backs, and the conservators don’t seem to have photographed both sides when the flag was being treated– or at least images were not available to me. This leaves open the question of exactly how the seams were done, but my best guess based on areas of loss is that the strips were stitched together with a slight offset, like a felled seam, and then the overlap was tucked under and stitched down with a running stitch.
This is less efficient: one person assembling an entire flag alone.
Assembly
This was probably the most delightful part of the research: figuring out how all the pieces went together. Once you see it, you can’t unsee it: flags were assembled in component parts, which were then assembled into wholes. Once we were working on the flag at the museum, the reason became clear: it’s so much quicker and easier to have multiple people working on parts, with one person assembling these parts, than to have one person per flag. This is proto-assembly line work, and it existed in 18th century workshops from tailors to cabinetmakers. Specialization equals speed, and the key to making money as a contractor supplying the army was quantity.
Canton components: A, B, C, D , E and F are assembled; AEB and CFD are sewn together to make two long rectangles, which are then sewn to the long sides of G.
In the case of the Tecumseh flag, there are three main components: the lower three strips, the upper three strips, and the canton, which is comprised of 7 parts. Each was assembled individually; then the canton and the three shorter strips were joined, and sewn to the long lower piece. After that, the hoist was attached and the far edge of the fly hemmed. Only then was the flag finished and ready for delivery.
Describing how strip(es) were assembled to become the Fort Mifflin flag.
The Fort Mifflin flag, 13 stripes of red, white and blue bunting, ending in red, would have been assembled in strips of two and then three, and then grouped and assembled. Working with Mistress V, the greater efficiency of assembling components became clearer. This hand-on quasi-experiment clarified some questions about how military contractors worked in the 18th century– at least the ones sewing. The system had to include multiple hands, working together in a shop or doing piecework at home for assembly elsewhere. There was just no other way to efficiently make the quantities of goods– 500 linen liners for light horse caps; 293 shirts; multiple standards and colours– at the speed the army required. The quantities also suggest that Rebecca Young was not just a widow-turned-contractor, but that she had working and organizing experience before she was widowed, along with a network of contacts who, along with some of her children, helped produce these goods.
Saturday’s arrangement. Image courtesy of the Museum of the American Revolution
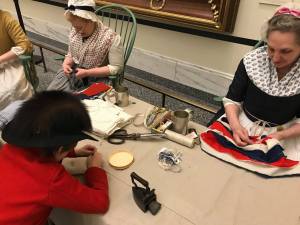
The biggest challenge in interpreting Rebecca Young and the shop she ran was not how flags were made (an appointment at the Cultural Resource Center of the National Museum of the American Indian answered that question*), but rather how to make sewing interesting, and how to create a more interactive experience for ourselves and for visitors. Some of my favorite living history experiences involve playing off other interpreters and the public, especially when trying to convince visitors to pick a side, carry a message, or share a secret. Saturday’s set up made that harder, with Rebecca’s shop of women behind a table (we wanted to be sure to be open to visitors, and not make the dreaded reenactor circle), and with Drunk Tailor rolling cartridges in a niche.
Nobody puts Drunk Tailor in a niche.
But what we saw on Saturday– a day with 800 visitors–was that boys between roughly six and 16 skipped from Drunk Tailor to the tailors, bypassing a table of women altogether. Older men (say, 45+) visiting alone also skipped our table, while the majority of our visitors were girls and women. This was not a surprise. Children begin to develop gender segregation around ages five to six, and sewing is often dismissed as “women’s work,” as the table of tailors experienced. These cultural biases were somewhat compounded by the nature of our work.
Tailor’s Art: Containing the men’s suits tailor, the skin breeches, the women & children’s body suit, the seamstress & the fashion merchant / by M. de Garsault, National Library of France
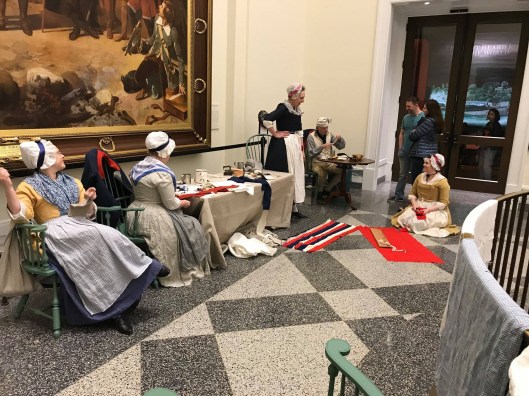
Sunday’s set up. Image courtesy of the Museum of the American Revolution
Sewing is one of those tasks that is downward-facing, internal, and meditative (until the thread tangles or snaps). It’s dull to watch, really; the exciting parts of sewing and making are draping, fitting, and cutting. Cutting. There’s something to that.
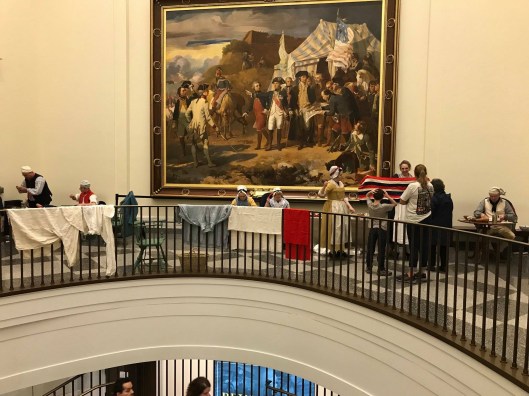
Combining the desire to interact more with our co-interpreters and the need to disrupt expectations of sewing, we rearranged the tables on Sunday, moving Drunk Tailor to our end of the atrium, postulating that his tea table and powder keg were in the yard of the townhouse, while we pushed our table closer to the tailors and against the railing, pulling our chairs to the side. We also draped shirts and fabric over the railing to display shirts and their component parts, along with bunting. While this “messed up” the atrium, it helped create a context for our work.
Sunday, workshops in a row (house). Image courtesy of the Museum of the American Revolution
But the best, most participatory change was Mistress V cutting flag strips on the floor, with the help of two young boys. This literally disruptive activity (you had to walk around her) changed perceptions of what we were doing, and helped people imagine assembling a large item (a Continental Standard) in a small rowhouse room.
If we take the Betsy Ross house** as an example of a Philadelphia rowhouse, , its exterior dimensions, roughly 16 x 25, yield an interior per-floor area of not more than 400 square feet. The Star-Spangled Banner was 30 x 42 feet; a second “storm” flag was 17 x 25 feet, large enough to cover the floor of a room in Betsy Ross house.
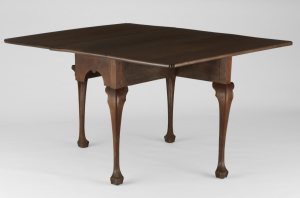
Dining Table (drop-leaf, gateleg table), probably Pennsylvania, 1750-1770. Walnut, oak. Philadelphia Museum of Art, 1994-20-60
While we do not know the exact dimensions of the flags Rebecca Young and her shop produced, it seems likely that any flag would have exceeded the size of a domestic table, since even drop-leaf dining tables of the period are not usually more than 52” x 41” or about 15 square feet (4.3 x 3.5 feet). The limited size of the table, and the need for multiple feet of cutting space makes it likely that flags larger than 3 x 5 feet were cut and pieced on the floor.
This combination of thought experiment and interpretive change up was reasonably successful, giving us greater understanding as we talked about assembling goods in pieces and working in a small shop while interrupting the visitor’s expectations.
*More on this another time.
**You have to start somewhere– and while I’m on #TeamYoung when it comes to flag making, Rebecca’s rented house has long been razed.
Research and primary source materials on Rebecca Flower Young were provided by Matthew Skic of the Museum of the American Revolution; compiled information used by gallery educators at the MoAR was compiled and provided by Katherine Becnel of the MoAR.


You must be logged in to post a comment.