HSF # 24: Re-Do (Thank goodness it’s done!)

Shirt, view number one

Like a zombie, I’ve returned to the Historical Sew Fortnightly with an undead shirt. I was working on it in August 2012, and at long last, it is really complete. So I offer it up as the Re-Do for HSF #11: Squares, Rectangles and Triangles, as it has no curves at all. (Well, aside from any wonky cutting I may have done.) It would also work for HSF #15, White, as it is actually white. Things happened in the basket along the way to getting done, and the half-made body had to washed.

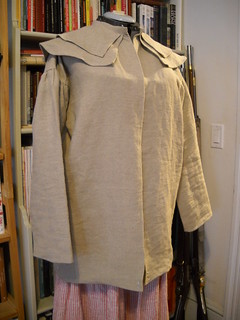
The thing about shirts is that they don’t look like much unless they’re well photographed, preferably on a human or a mannequin with arms. I lack the latter, and the former specimens were not worth asking, since they’d been made to work all weekend.

So, some facts are in order. right?

The Challenge: #22, Re-Do. (# 11 and/or #15)

Fabric: White Linen, 5.3 ounce, I think. It was a while ago.

Pattern: This would have been cut from the Kannik’s Korner shirt pattern, though more by using the pieces to mark and measure and make sure I had all the small squares and bits the pattern takes.

Year: 1770-1790, depending. At their class level, the guys can keep wearing this kind of shirt for a long time. (It will be the Young Mr’s.)

Notions: Two thread buttons, one bone button; all three from my strategic reserve as the new selection of thread buttons has vanished (I blame the cat).

How historically accurate is it? Well, let’s give it 75%. It’s all linen, but the selvedges aren’t right, the stitching is variable and the insides are not all finished correctly. Patience, Iago, patience…there will be time for the last felling over whipstitching. I suppose for the common shirt it is, the coarser linen and variable stitching might boost the accuracy a bit. 82% for intentions, points still taken off for knowing what’s wrong with it.

Hours to complete: Freaking endless. I lost count, but in the end, probably five hours to finish button holes, felling, hems, and side gussets. The problem is that it’s repetitive and boring: back stitch, prick stitch, slip stitch, hem, all in straight lines. And this was shirt number three (four is right behind for Mr S) so the thrill’s gone out a bit.

First worn: Rejected in nearly-finished but unhemmed state by the Young Mr at Fort Lee, thoughit would have stayed in his trousers better than his too-small-clothes, he’ll wear this shirt in February at a celebration of Washington’s birthday.

Total cost: $17.74 for the fabric, I forget for the buttons and there’s always thread in the house. Call it $20 all told.

A Swedish Spencer

The Swedish Spencer
The Swedish Spencer

Because I lack good sense, I have fixated upon this Spencer from a museum in Lund. I have inflicted it upon people who have no particular interest in women’s wear, and extracted opinions on the fabric. Shameless, really. But I love the simplicity of this garment, and have therefore closed my eyes, written a check for some Kochan & Phillips bottle green broadcloth so that I can pet the wool to cheer myself up while patterning this beast.

To be fair, I have a Spencer half-patterned, and need “only” to work on the sleeves and collar. I have a sense, from examining a friend’s frock coat, of how to construct this stand-and-fall collar. Pad stitching, here I come. I enjoy the challenge of sleeves and hope this will not break me of that. So far, I have not been able to find a photo of the back of this lovely garment, so I’ll have to extrapolate from other examples.

I’d thought about making this for the Historical Sew Fortnightly # 21: Colour Challenge Green, but it took me too long to commit to the K&P wool, and at that price, you can bet I’ll make a careful muslin. While I’m not certain when or where I will wear this, I already know that I will wear it with my black petticoat and green boots, and will have to make a shirt to go under the petticoat, which will be its own challenge.  

Puffy sleeves aren’t my thing, and they won’t fit under these trim Spencer sleeves, but there is at least one extant example of a long-sleeved shirt-like garment. I expect I will feel about chemisettes much the way I feel about caps…but in the end, it will be worth all the tiny hems and the muslins. After all, the Spencer has a huge bonus: it closes with clasps so there are no buttonholes!

HSF# 17 Robes & Robings

I started on the HSF#15 Color Challlenge: White, but haven’t finished the white petticoat yet. It’s a bit short, and pieced in the back, but having seen Sew18thCentury’s  curtain along petticoat online, I wanted a bordered petticoat. (There are extant examples in museum collections, and one in Fitting and Proper, if you’re keeping score.) Now that I’ve seen the petticoat in person, I will definitely stick it out for a border….all in good time.

Native Meltons: she's out there in plain and colored lithographs
Native Meltons: she’s out there in plain and colored lithographs

I did originally think that I might get this gown completed for HSF # 15, but I did not. I came close, became disheartened, and stopped work on it for a time. Not only did I think I could not adequately document the fabric, I worried about style, fit, and fabrication. At some point, though, I rallied, and finished the gown. Yes, it looks a lot like Emily’s, because it is based on the same print.

I know, you’re here for The Facts.

The Challenge:  HSF #17: Robes & Robings

Finished! Another garment in the “Am I Blue” Ocean State Line

Fabric:
Indigo Cross Bar Light-Weight Check Irish Linen from Burnley & Trowbridge.
I collected images of checks and “plaids” on a Pinterest board. Remember that plaid doesn’t mean the same thing in the 18th century, but I used the term to help people know what the board included.

Pattern:
My own, based on a fitted lining and draped to the dummy, tried on and tweaked. You can see some construction progress here. Yes, that’s a center-finding ruler. Yes, it has extra pleats. Call it bling for the linen-wearing.

Matching crossbars is crazy, but fun.

Year:
Let’s call it 1760. It’s an open robe with robings and cuffs suitable for 1765, but I’m old enough to keep wearing that style. Actually, the double-lapped robings (which I really like the look of) are earlier– see this Pinterest board–but I like the way the fold creates a decorative element in linen and wool. The probable 1750s date for the double lapped robing caused another round of heartache in the documentation land. Oh, well. Carrying on wearing the older style…

Notions:
Does thread count? That’s all this takes.

Bowers_check
Newport Mercury, 7/11/1774
Geyer_checks
Boston Post Boy, 3/11/1771

How historically accurate is it?
Well…In the right circles, one could argue that for some time. Is that not the circle one wishes to be in? Consider this, then: The gown is hand-sewn using period techniques as much as I can muster. It is based on pictorial examples from the 1750s through the 1760s. I have found newspaper advertisements for “CHECKS” in Newport (Newport Mercury, July 11, 1774) and “checks of all wedths” in Boston (Boston post Boy, March 11, 1771). Wedths means of fabric in all likelihood, not widths of the checks, so while one can find evidence of people wearing what we’d call plaid, mostly silk but the oyster seller is likely linen or cotton…we don’t know exactly what  every “checks of all wedths” fabric looked like.  I’ll go with 75% accurate and 25% conjecture and choose my wearing venue with care. Yes, I can over-think and rationalize anything.

Hours to complete:

I did this many, many times. It’s like being a carpenter with fabric and pins.

Actual sewing? 16 to 18 hours, I think; it’s a lot of hemming. The body of the gown, the draping and the lining were constructed in about a day while the guys were out doing musket-related things. The agonizing and over-thinking consumed more time. Documentation took, on the whole, perhaps 2 or 3 hours of museum collections and newspaper searching.

First worn: 
Not yet! I’m not sure when I will, now that the weather has turned. I meant to have this done for Sturbridge but despaired of the design and fabric. It’ll be wool for Saratoga, so who knows? I’d like a photo, though.

Total cost: 
Mental agony? Priceless.
Fabric? $60.

HSF # 11: Squares, Rectangles and Triangles

Hunting frock from the side. Just two sizes of one curve

I drifted away from the HSF. While, at some point, I had plans for HSF #11: Squares, Rectangles and Triangles, and they were even written down somewhere, something like table clearing and recycling happened…but, hey wait a minute, if you will allow me one curve done twice, I give you the Hunting Frock! (also, the checked bag).

Since there was a search for “best rifle frock for rev war reenacting,” I think this probably bears going into.

Presented, for your consideration, The Facts.

The Challenge:  HSF #11: Squares, Rectangles and Triangles

Without fringes or hem

Fabric: 100% “Osnaburg” linen, acquired from Henry M. Cooke IV of Historical Costume Services. I think he orders from the Ulster Linen Co. We are talking bolts here, people.

Pattern: Cut by Mr. Cooke, who used a yardstick, chalk, and an extant shirt (for the cape curve). I have watched him cut two now, and it’s pretty cool.

Year: 1778-1781 <choke> I forgot to ask.

Notions: Does thread count? That’s all this takes.

resolver

How historically accurate is it? Based on Mr. Cooke’s research into the hunting shirts worn by Massachusetts troops, and revised to reflect recent research by Neal Hurst, this frock pattern reflects the most current, accurate representation of the hunting frocks (sometimes called shirts) worn by Continental troops during the American Revolutionary War. The garment is entirely hand-sewn using, as much as possible, the correct (thankfully basic) stitches. Flat-felled seams, all that good stuff. Any place it is incorrect is purely my own genius.

Triangles and trapezoids!

Hours to complete: Remember those soul-crushing hours? Yes, these were among them. Actually, no, it’s not too bad. Perhaps twenty-four? You can power down on one of these, but even once you have the initial fringing done and the fringes attached, you will have more thread-pulling ahead of you.

First worn: Monday, May 27, 2013, for the Memorial Day Parade in Warren, Rhode Island.

Total cost: $45, for the linen and the cutting. Your mileage may vary, as the Young Mr and Mr S are in the regiment for which Mr. Cooke is the adjutant.

Hunting Shirt/Frock Schematic
Hunting Shirt/Frock Schematic, no scale whatsoever

To the person looking for the “best rifle frock for rev war reenacting,” I have to say, it depends. If you are with a Rhode Island regiment, for example, the linen you choose could be brighter, to reflect the fact that the state called for “whitened towcloth” for hunting frocks for Rhode Island troops. I have found some I think might be likely at Burnley and Trowbridge, but I have not checked it with the RI captain. You need to know if your regiment or group favors hunting shirts (pull over) or hunting frocks (open down the front), and then you need to figure out what kind of linen they were wearing in the period.

But, like a shirt of the period, these garments are very simple: triangles for the gussets (or squares), rectangles, and just the curved cape. The pattern (schematic) at right is adapted from what I have seen Mr. Cooke cut, which is quite similar to the Brigade of the American Revolution pattern I had for the Rhode Island frock I made (also entirely by hand). Since these were so close to shirts, they would have been very easy to construct, and since they’re large, measurements could be generalized. The BAR pattern does not use the under-arm gussets, and the sleeves are not tapered; there is more fringe on the standard Rhode Island frock than on the Massachusetts frock, but there seem to have been variations at the time.

You may also wish to consider whether or not there is a difference between hunting frocks and rifle frocks (I do not know, please don’t ask, I wasn’t told this would be on the test).

For more, here is Neal Hurst, on Fringe on the American Hunting Frock. You can read it before or after you pull threads out of those two inch strips until only 6 to 8 remain in the center. Happy fringing!